Poor old Ellen has become Molly and Molly (this picture) is now Ellen. No good asking me why they just seemed to be the wrong characters for the characters, if you see what I mean.
Any way - here's (the new) Ellen going through her accounts in the workroom. Molly is now stuck in the shop with Mrs Singer .
Anyone who is as cracked as me and wants to know the story of Bentleys can find it in the links at the top of the Blog. There is all kinds of stuff there including what is happening (in each room) on this day - Wednesday 11th October 1911. For anyone who has already been there - you might want to take another dip as I keep messing around with it.... the latest body swap being a good example.
My camera is a very basic Sony point and shoot and needs all the help it can get. I promise you it isn't me - I can take photos OK given the right tools.
I get fed up with its inability to deal with uneven light levels and camera wobble - all of which its advertising bumf claims it does brilliantly. Maybe I am pickier than their average customer. Any way I decided a small tripod (borrowed from him indoors) and a light box might help.
This is an obvious bit of construction if you want to try it and costs next to nothing. Take one cardboard box: cut out the top and two sides, leaving roughly an inch frame all round each hole, cover the holes with baking parchment to filter the light a little. This particular parchment may be too dense. White tissue paper would probably do better. I now need three lamps all exactly the same. I tried jiggling around with two lamps but their lights are totally different and they keep fighting with each other and producing masses of shadows. I did end up using the best light as a single spotlight. It is standing on a couple of boxes to gain enough height behind the light box. Even as basic a set up as that gave better results than just taking photographs of stuff balanced on desks, windowsills and beds trying to catch the best light in the room.
I did have 37 to do as I am taking bits and bobs to EBay in America so I really noticed the difference. I might just invest in three lamps if I can find some really, really cheap ones.
It seems the main characters in my projects are, somehow, my alter ego. A bit worrying? Ellen, therefore, is super-organised. Not for her a chaotic workroom..... a place for everything and everything in its place.
Here's the wood I bought on Sunday converted into boxes on Monday.
This is the old counter which she uses in the workroom for all sorts of things and it needs to be kept as clutter free as possible.
The boxes in the counter were simply made by cutting five pieces of wood and gluing them together. At this thinness they can be easily cut with a craft knife.
I rounded off the edges with 200 grade sandpaper and gave them a couple of coats of the 'shed' paint and a final rub down with wire wool. You might know the top row of cubby holes in the counter were slightly larger than the bottom ones, so I had to figure out two sets of dimensions. The labels were just printed on my computer using a small setting. Ellen had to make them using cardboard and a steady hand with pen and Indian Ink.
The box beside the counter with the rolls of fabric was made in the same way. This time I painted it with one coat of a mix of green acrylic paint and water-based matt varnish. I then added a bit of brown and went over it again while it was still wet. I wanted it to end up looking like mucky old wood. Looks OK to me.
The rolls of fabric are made from chopped up bamboo BBQ skewers and strips of three inch (36 inch wide dressmaker's) fabric. I put small spots of glue here and there as I rolled them up to keep them in place. I am sure you could do it by pre-soaking in spray starch or hair spray, but this was easier, dries faster and doesn't show. I gently coated the tops of the fabric edges with a little glue so no stray threads give the game away. The top edges look like proper selvedges.
The wall unit above the counter was originally in my Wentworth bathroom. I had already added a towel rail under it that I had to pry off. Super-glue works really well sometimes! I then made four cardboard rolls to go on the rail. These are a straightforward construction of rolled paper for the tube centre and two discs with a hole in the centre for each end. Sounds easy, but they were very fiddly. If you were making these in any number, or if you are already a crafter with paper tools, any cutter which would do the two circles would be a joy. I bodged away with embroidery scissors. I then rolled on dental floss (!) for string, half of some white bias binding for some broad bias fabric which would be used in all kinds of ways when making hats and in dressmaking and two stiff tapes that I have that look a bit like buckram. Again, all these were rolled on using spots of glue to keep them in place.
The storage boxes on the shelves are made from a small basket printie. I made them in paper and painted them with matt varnish to strengthen and finish them. I added labels like before. The shelves also have a basket of leather strips used for belts and trimming. Yes, they are real leather. There are some squares which look like felt made out of a glass cleaning cloth. I attached a hook and scissors for good measure and I will add a couple of tins or boxes or glass jars to fill the odd spaces at some time.
Another reason for having this storage was so that I didn't have to buy masses and masses of haberdashery stuff. I might buy a few things and pad out the boxes in some way and add a couple of things to the top of them so they look as though they contain what they should. I don't know how you can tell they are empty, but I think you can. It is slightly less obvious now they are in situ at the back of the room.
This photo was taken in my half-finished light box.... that's a post for another time.
On Sunday we went to a dolls house fair in Manchester (Handforth), which was a great location for us as it was only about forty minutes away.
It was a fairly small fair, but all the stalls were good ones and there was something to look at on each of them. Admittedly I only spent about an hour there: I am so picky now about what I do and don't want that I am not a good example of how much most people could get out of it.
I bought a handful of things and spent under a tenner in total. It cost us more in petrol and the £2.80 a cup hotel coffee than I spent at the show. Incidentally - for future reference - there was free tea and coffee at the fair. As my other half reminded me - it isn't about balancing the books it is for the pleasure of 'mooching' around little things. Also, I really like the few things I bought, so I came home a happy bunny.
I even managed to remember to get a business card with each purchase, so I would know what I bought from where.
I thought all these three from Matlock Miniatures were really finely made and fantastic value. The stools were £1.50 each and the (milk) jug was £1.25. The jug is already nestled nicely in Bentleys. It is on my food cupboard's marble top and is covered with a crocheted (beaded) food cover.
The stools could be used in Bentleys but they are being saved for Chocolat or even Starfish.
This was a truly fortuitous find. There weren't any stalls selling 'construction' stuff. One or two had a few bits and pieces of trim. Luckily one stall - Loverseeds - had a few pieces of wood.
I had started making some boxes for the shop on Saturday and had run out of wood and was hoping I could get some at the fair. Hey Presto, just what I wanted and at a good price (?).
These two pieces are 1/16th thick, 3''wide x 18''long. I'll show you the boxes I made from them in my next post.
Another example of my magpie trait is my inability to resist ribbons and fabric. I easily convince myself they will prove really useful. We'll see.
Why bother to wrestle your conscience when they come at these prices. The ribbons were 3 bags for 50p and the bag of two kinds of fabric and lace and ribbon was £1.25.
These were from Pan Miniatures.
Last, but not least, I bought a really tiny magnifying glass. They are usually way out of proportion, even allowing for people having large magnifiers, so I was pleased to see this one for £1.49.
I didn't buy it broken, I managed to do that myself! Using the micrometer bit of my brain I decided it was just a smidgen bent so I thought I'd just straighten it.... mmm....
Luckily - using a magnifying glass! - I super-glued it back together successfully and I will have a word with the residents of Starfish to treat it gently.
This came from Platts Mini Packages. If you don't get to any fairs you may not know them. They have literally thousands of all sorts of packages covering a wide span of history. Certainly enough choice to go at for stocking a kitchen or a shop. You can find them on-line.
I thought I would share some of my latest EBay snares with you. I don't always remember to photograph them or share them.
The first one here shows an unfinished pedestal. When I have buffed it up it will be used for display, like this, at the foot of the stairs (maybe?). I actually bought it for one of my plants but the plant is a bit too large and top-heavy to look right on it. I could make a smaller plant. Two thoughts on it being at the foot of the stairs - it is seen as soon as you walk into the shop which is good, but it would be a pain for Ellen to have to move it any time she wanted to go upstairs. It would be silly for her to have to go outside and round to the back to get up there. The back entrance into the kitchen is really for Daisy and Tradesmen.
I am pleased with the three dishes for 99p. I needed an oval dish for the dresser shelf. I have a paper one in place at the moment waiting for a replacement, so one of these will do nicely and the other two will find a home in this or another project.
The two bags of findings were a single purchase. I think I am a magpie and just got caught by shiny things because I have no idea what to do with them... but they were a bargain!
My method with EBay is to lob my bid on many 99p starting prices of things I could use. Sometimes, if there is no other interest, I get lucky. Then there are occasions when I see something a bit more unusual that I want. I work out my maximum bid and enter that and then never go back to it. I either get a - sorry you were outbid note or occasionally it becomes mine. My general rule is that the object and its postage shouldn't cost me any more than it would to buy from a show/shop. This doesn't always work as a guide in the case of one-off pieces and I suppose in all honesty the only true guide then is how much I want it and am prepared to pay for it - an auctioneer's dream.
I am pleased with a little working hat-box I made and will make some more like it when I get a chance. I will use cord rather than ribbon though next time. You may be wondering what a working hat box might be?
Proper (travelling) hat boxes have a cord threaded through them so that you can lift the lid to put in and take out your hat but then when you've replaced the lid you pull the cord and it ties down the lid and gives you a handle to carry it with. Only hat boxes used for storage (often leather) didn't have this.
Box open waiting for hat - and tissue paper!!
Lid replaced and waiting for a gentle tug on the handle.
Et voila! One hat box ready to carry away.
Just in case you think it isn't a 1/12th - here it is with a full size hat box of mine.
I will post some more tomorrow. There's other bits and bobs to share but it late and time for a cuppa.
This is the last plant for a while. It is about five inches tall and is for the salon.
The metallic looking pot is made of leftover 'anaglypta' paper that I used in the stairwell. I made two hexagons for the base and then made a one inch wide strip, marked into six sides, with tabs for gluing along the bottom edge and a small piece to fold over on the top edge to get rid of the cut paper look. I then creased and folded it, stuck the tabs on top of one of the hexagons, taking care to make sure everything was neatly edge to edge. I then glued the second hexagon inside at the bottom of the pot to cover the tabs.
I painted it with green paint and then gold acrylic paint while it was still wet so I could get an aged looking copper pot. I didn't want it to be bright gold. I think it is OK but maybe it needs some more leaves added? As I said I will be leaving it for a while and, somewhere further down the line if I don't buy better ones, I will look at all these plants again and see if I can improve on them or just make them again with more precision.
You'll need to do a click on the picture to get a better look at what's going on here. I can't really tell you how to do these as the instructions came from someone who sells them - The Miniature Garden - so that would be a bit naughty. I can, however tell you they are made from masking tape, florist wire, some glue and acrylic paint. I also glossed my leaves with nail polish. I was making a mother-in-laws tongue plant and people used to wipe all their glossy leaved plants with a little milk (or cream!) to make them shine, so they needed a bit of a boost from the matt acrylic finish I had given them.
Now I've got the bit between my teeth I might have a go at making better ones than the two I have done so far. They just need a bit more care and detail. I may not have to buy my house plants after all. Let's see how I do when I make the very tall parlour palm I want for the salon.
This second attempt came in with a couple of improvements. Firstly, I filled the bottom of the pot with a little black Fimo. I wanted the extra weight but mostly I wanted to be able to push in the leaves and have them stay in place. When I made the areca the stems were a bit twirly in the sand until the glue hardened up and that took too long to hang on to them, so some aren't quite as I would want. This way the 'tongues' stayed where I wanted them to go; I topped up the pot with my Marilyn created dirt and here they are.
I wanted this plant to replace the vase of red roses which I have always thought looks out of place in a 1911 parlour over a shop in October, when roses would have been a very expensive purchase. It will look even better when I find a mirror for this space.
The pot again is made from the wooden floor paper and this time I left it just with a glue wash for a bit of a shine. I think it looks a bit like a bamboo cache pot. Bamboo was all the rage in 1911 and Ellen (so far) only has two small mirrors in bamboo.... she and I need to go shopping.
I've been waiting to find/afford three largish plant pots for a parlour palm, an areca and a mother-in-laws tongue. I intended to make some temporary plants to go in them to tide me over until I see some nice ones I can afford. I have seen plenty of really lovely ones but twenty pounds upwards is a bit daunting.
Having made the little pot I decided larger versions of that would do until something else came along. This one was made with the left over border paper from the salon, cut into three strips to get the right width and the pot was made the same way as the one in the kitchen only slightly bigger. This one is an inch across the top.
I made the areca palm with some green almost plasticy, stripy fabric I bought for 25p somewhere. I thought it might make plants. They are fairly obviously constructed. I worked out their size, cut out some oval shaped leaves and stuck a piece of green florists wire down the back of them. Luckily this was before bedtime so they had tons of chance to dry before I got to them again. I am dreadful at not letting paint or glue dry properly. I then hacked all along the leaves, roughed the edges up with my fingers, bent them a little and sat down to figure out how to make dirt. I wonder if God had this problem.
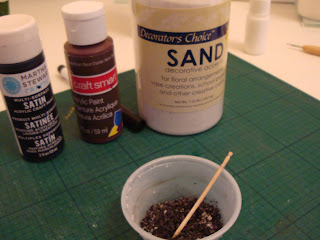
My solution was just brilliant. Some white florists sand which seems to come in handy for all kinds of things. I just used it to fill the handbags I made to give them some stability, for example. Any way in that went into the mixing pot along with black acrylic paint and brown acrylic paint and some glue. Again, I can't give you any quantities, it was just a case of getting the colour I wanted and mixing it all with a toothpick until there was enough glue and sand in it to make it all come up looking like dirt. The white bits you can see here do get mixed in properly.
Handy tip, you only need a tiny bit of all of them to do the job, you are not making an allotment. Into the plant pot it went, in went the palm leaves and the following day it had all set rock hard and stands up well under its own weight with no tacky wax needed.
This is the equivalent of a three foot tall plant. It is to go on the floor in the shop near the gentlemen's seats. I need a couple of comfy seats, a small table, some newspapers and a hall stand for their hats, gloves, walking canes and brollies.
I wanted a dish/pot for the eggs on the food dresser as the dish they were in took up too much room. I suddenly had this brain wave.
I had some floor paper which I had rejected early in Wentworth's life which I cut into strips using my cutting mat to mark the pieces as I went along - no fussy measuring and marking. I glued a few together and wound them round into a tight circle. Think of liquorice wheels. You need it to be as wide as the size of the top of the pot that you want to make. I think this one was just over half an inch. Stick down the last bit of the strip and wait for it to hold. Then I stuck the end of a medium wide felt tip pen on it to hold the bottom down and then gently pulled up the sides until I got the shape and size I wanted. If you are careful you can shove it all back down again and keep going until you get it how you want it.
I ended up with this. (Sorry about the photo) I then mixed some water with the usual every day Aleene's glue that seems to do just about everything. There was no particular ratio of water to glue; basically I just added enough from my brush to make the glue flow more easily. I then painted the pot inside and out and, being the usual impatient me, dried it with the hair-dryer.
I ended up with a slightly shiny very solid pot. The picture is before the glue. It looked even better after 'glazing'.
Finally I mixed some green acrylic paint into the bit of water/glue mix that I had left and painted over the outside of the pot and just inside the rim. This gave me a cheap rough glazed plant pot that Ellen uses to keep her eggs in.
I love instant gratification - the pot I wanted pretty much for free and with no having to hunt around for it.
Here are a couple more things from the brilliant Valerie Claire . These are various cards for silk ribbons and lace etc which you 'fill' yourself.
Here are some cards with embroidery thread on and some cards with lingerie lace added to them in white cream and pale blue. They aren't overloaded with lace as I want to make a box for them to go in and I don't want them being too bulky.
They are for the counter in the shop which I will show you when it is finally finished being dressed.
I assembled the nice little set of three shelves I bought at Miniatura. They are precisely the right size for what I wanted and very plain which I also wanted. I painted them with left-over Country Cream Cuprinol shed paint (!); let them dry and rubbed them down with wire wool - hoping to dirty them a little. It was only a little. I repeated the process once more and settled for this, though they are not as scruffy as I would have liked. I wanted them to match the dresser I bought ages ago which is very 'distressed'. They pretty much do that.
My brainwave, shown here, was to make shelf paper and glue the food on to that and then load the shelves. I had spent ages fiddling around with tweezers trying to set things on the shelves but something was always throwing a wobbler. This was the solution; it was easy to position the items on the paper, easy to load them paper and all onto the shelves and it will also be easy to re-do them somewhere down the line if I want to.
Don't worry about it all looking a bit rough and ready - honestly it was the look I wanted to achieve. These would have just been some shelves from the draper's shop workroom which Ellen would have painted to match the dresser. There was a great fashion for light coloured painted furniture so I expect a lot of Ellen's stuff to be rehashed pieces from Summerlee House. I made the shelf paper out of some wallpaper that I had. I just cut off the part where there was a border and cut roughly round the border to give it a more interesting edge. They are supposed to look like the shelf paper you used to be able to get quite cheaply. It could be replaced fairly often when it got grubby with food bits and bobs. It looks as though Daisy has only just changed it!

This is the equivalent of Ellen's pantry. She doesn't need much as there isn't a lot of food preparation done in the apartment. There is enough stuff between here and the food safe for breakfast and suppers and the occasional piece of dripping on toast or a jam butty. You will notice there isn't a bowl of fruit in sight. Even by 1911 they weren't that great at eating fruit and vegetables. Five-a-day was unheard of. Also food was seasonal so, by October, there would pretty much only be apples, pears and plums easily available. Even those might have been scarce in October 1911 as it they had just had the summer which broke all records for heat and longevity, ending on 13th September. I suspect the fruit harvest had arrived early that year.
These are the shelves in the context of the kitchen. I am very pleased as it looks just how I wanted it to look. A modern young lady's 1911 kitchen.


