I'm not too thrilled with the mock lincrusta in the kitchen. I used an embossed dolls house wallpaper which would probably have been terrific for ceilings - maybe this is what it is intended for? On the wall the tiny pattern got pretty lost and by the time it had taken two coats of paint it had almost entirely disappeared. I'd also made a bit of a mess painting it; I got paint on the cream wall where I didn't want it. All this, and it only got used in there in the first place because I bought it for the stairs, and then decided that looked too complicated.
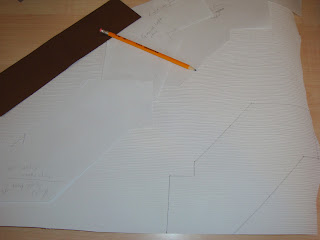

I then managed to get my hands on a large sample of 1:1 Anaglypta that looked the part, so I thought I'd have another go at doing the staircase. After having struggled a long time with a pencil and ruler and a rubber (!) marking up the walls for papering I suddenly realised the obvious way to do it was to make paper templates and cut the wallpaper out from those. This proved even more necessary as I only had just enough for the job. No room for error. It was a good job I did it this way as I went on to discover just how wrong some of my original pencilled-on-the-wall guidelines were. This is a picture of me transferring the template to the real McCoy ready to cut out. The test fits of the templates had gone really well.

I then realised I might as well do the painting before sticking up the paper. This way I wouldn't splodge paint everywhere and if the paper looked rubbish I could just abandon it; no harm done. This is the first coat of paint. Can you even tell it is a different colour to the one in the kitchen? I could kick myself for buying Farrow and Ball sample pots at £4 a time and then choosing two lots of two colours that are so close as to make no difference once they are in situ. The colour of the workroom and the upper wall of the kitchen are pretty close and, as I said, the two 'lincrusta' paints are very similar. Beware of over-egging the pudding and being too picky about some things. That would have saved £8!

Two coats of 'lichen' and one coat of satin varnish later and I am very pleased with the result. This is how lincrusta should look. The pattern is also good for 1911 as cane, bamboo, fresh cottons, linen and other natural fabrics were being used in their 'Arts and Crafts' style homes. Ellen seems to have a foot in a backward glance to Morris and a forward glance to Voysey - all very possible as stores like Liberty promoted both styles (and loads more).

This is a bit of a handy tip photo. If you have small things to paste (or paint) use an old magazine to do it. You can plaster paste (or paint) everywhere, park the item somewhere to dry and just turn over to a new clean page for the next piece. My large drying surface is a one dollar shower curtain across my table. When you are pasting you do need a surface where you can slosh paste over the edges of the paper as they really need to be well covered for a good finish. I use border paste for wallpapering and find it is strong and lump free and does a good job. [Apologies for taking the photo when I was on the slug page! I am not sharing my workshop with the (not so) lovely creatures - they are just photos, honestly]

It was the simplest thing in the world to slide the pieces into place. Here it is on the ground and first floor, all ready for the dado rails and maybe a paper border (?) to be added.

These two photos just show you the difference between the stair paper and the kitchen paper.
 As I said the stairs are excellent ....
...... kitchen, not so much

Today I started painting some of the wood.
Last night I cut the pieces of dado rail to go around the stair paper. I identified each piece with a number written in pencil on the back. I simply started at the top of the stairs and numbered every strip in turn as it went down the stairs. So when I come to glue them in place it will be as simple as doing it in numerical order. There are seventeen pieces.
Cutting the various angles was really very troublesome until I again realised that the answer was paper templates. If you don't get the angles exactly right where two pieces meet, one piece of rail will be wider than the other because it has been cut on too much of a slope. Some of the angles proved to be a nightmare if you were relying on accurately measuring and halving them. Who wants to halve 143 degrees for example. It was so much easier to cut strips of paper the width of the rail, lay them along the edge of the wallpaper paper templates and then cut through accurately at the point where they crossed each other. These paper patterns were then transferred pretty easily to the backs of the strips of wood. Even then, after cutting fiddly routed bits of wood (plus the occasional 45 degree slope for corners) they aren't perfect; but I am learning to accept a degree of imperfection to save my sanity (and my purse!). I think they will be fine when they are in place. Hopefully, the stairs themselves will hide a multitude of sins.
I keep finding almost every job I want to do is still being held up by another. Even these rails have been done with some finger crossing because the doors aren't in place and they meet the door jambs at regular intervals. I don't think I will glue them in place until the doors have been glued in. I have had to leave just two of the pieces (!) until the stairs are fitted as there will be a newel post in their vicinity and I am not at all sure how that will all go together.
I have under-coated all the doors but I can't put the doors in until the floors go down. I can't do the floors until the lights and fires and their wiring is in place. I am waiting on two lights and a fireplace (unchosen as yet!). Happily there is a heck of a lot of preparation to keep me busy for a long time. I hope to finish my buying at the York show in June and fitting things will just have to wait until after then.
Looking at all the first coats I am sure they will need rubbing down before applying their second coat.
I didn't like the shop door which came with the kit so way back when the kit arrived I got my resident chippy to re-cut the door hole to fit the door I had already bought for the Honeychurch (remember that?). This one comes with 'glazing'. I couldn't figure out how to disassemble the door for painting. I have seen how to do it somewhere on the web but it looked a bit precarious to me. I just used a Number 2 artist brush to carefully paint next to the 'glass'. So far, so good. The glass came with a couple of marks on it which I can't get off so my excessive care seems a bit late really.
One lesson to be learned from all this is not to slavishly follow anyone else's order of build. I had already clipped and read and reread three (fairly!) comprehensive ones in my pre-build research and not one of them bears any resemblance to what is actually happening with my project.
Two of them are from people who do this sort of thing all the time for commissions. I can see how they are able to have a set construction routine as they will, no doubt, have any and all of the bits and bobs they will need right at the outset. Most of the rest of us are trying to find stuff as we go along and are sometimes held up by not being able to find it (!) or (a temporary) lack of funds.
The third of my detailed instructions is in a blog similar to this and, like me, she has gone about it the way which suited her time and money the best, so that doesn't particularly match my approach either.
That said, it was comforting to read other order-of-builds as it was less like stepping off into the unknown. They also gave me plenty of prods and nudges to help me understand the best approach to my project. In that vein I hope my minutely detailed record is useful to someone else's build, some time, in some way!
That said, it was comforting to read other order-of-builds as it was less like stepping off into the unknown. They also gave me plenty of prods and nudges to help me understand the best approach to my project. In that vein I hope my minutely detailed record is useful to someone else's build, some time, in some way!
No comments:
Post a Comment
To prevent spam your comments come to me first. I will be as fast as I can to post them and reply. Please do leave a message.